NHibernate
The object-relational mapper for .NET
Wiki extracted from the original blog post of Gabriel Schenker
If you're reading this, we assume that you've just downloaded NHibernate or installed it from NuGet and want to get started using it.
This tutorial will talk you through the following:
This is what we're aiming for:
But first things first [:)]
Lets start by actually doing something with that ZIP file you just downloaded.
If you've downloaded the NHibernate binaries in a zip file, all you need to do is extract that file to somewhere sensible. I usually create a folder called SharedLibs c:\Code\SharedLibs\NHibernate and extract the zip to there. But whatever you're comfortable with. This is your SharedLib folder from which you need to add your references to the NHibernate and NUnit dlls. Add references to NHibernate to both the demo project and the unit test project.
That's it! NHibernate is installed (easy huh). We'll talk you through using it with Visual Studio in a moment. First let's look at how we go about creating a project. Note this code is dependent on Visual Studio 2008 and .Net Framework 3.5.
Before we start building our application and business objects, we'll need to create a blank project to put them in. Fire up Visual Studio and create a new Class Library project. Let's now look at something interesting: creating a business object.
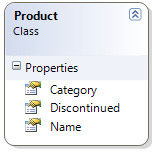
Lets start by defining a very simple domain. For the moment it consists of one entity called Product. The product has 3 properties Name, Category and Discontinued.
Add a folder Domain to the FirstSample project of your solution. Add a new class Product.cs to this folder. The code is very simple and uses automatic properties (a feature of the new C# 3.0 compiler)
namespace FirstSolution.Domain
{
    public class Product
    {
        public string Name { get; set; }
        public string Category { get; set; }
        public bool Discontinued { get; set; }
    }
}
Now we want to be able to persist instances of this entity in a (relational) database. We have chosen NHibernatefor this task. An instance of an entity in the domain corresponds to a row in a table in the database. So we have to define a mapping between the entity and the corresponding table in the database. This mapping can be done either by defining a mapping file (an xml-document) or by decorating the entity with attributes. I'll start with the mapping file.
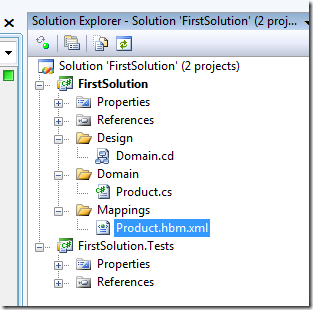
Create a folder Mappings in the FirstSample project. Add a new xml-document to this folder and call it Product.hbm.xml. Please note the "hbm" part of the file name. This is a convention used by NHibernate to automatically recognize the file as a mapping file. Define "Embedded Resource" as Build Action for this xml file.
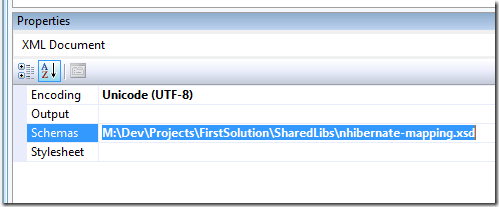
In the Windows Explorer locate the nhibernate-mapping.xsd in the src folder of NHibernate and copy it to your SharedLibs folder. We can now use this xml schema definition file when defining our mapping files. VS will then provide intellisense and validation when editing an xml mapping document.
Back in VS add the schema to the Product.hbm.xml file
Let's start now. Each mapping file has to define a <hibernate-mapping> root node
<?xml version="1.0" encoding="utf-8" ?>
<hibernate-mapping xmlns="urn:nhibernate-mapping-2.2"
                   assembly="FirstSolution"
                   namespace="FirstSolution.Domain">

  <!-- more mapping info here -->

</hibernate-mapping>
Now we have to first define a primary key for the product entity. Technically we could take the property Name of the product since this property must be defined and has to be unique. But it is common to use a surrogate key instead. For thus we add a property to our entity and call it Id. We use Guid as the type of the Id but it can as well be an int or a long.
using System;

namespace FirstSolution.Domain
{
    public class Product
    {
        public Guid Id { get; set; }
        public string Name { get; set; }
        public string Category { get; set; }
        public bool Discontinued { get; set; }
    }
}
The complete mapping file
<?xml version="1.0" encoding="utf-8" ?>
<hibernate-mapping xmlns="urn:nhibernate-mapping-2.2"
                   assembly="FirstSolution"
                   namespace="FirstSolution.Domain">

  <class name="Product">
    <id name="Id">
      <generator class="guid" />
    </id>
    <property name="Name" />
    <property name="Category" />
    <property name="Discontinued" />
  </class>

</hibernate-mapping>
NHibernate doesn't get in our way such as that it defines many reasonable defaults. So if you don't provide a column name for a property explicitly it will name the column according to the property. Or NHibernate can automatically infer the name of the table or the type of the column from the class definition. As a consequence my xml mapping file is not cluttered with redundant information. Please refer to the online documentation for more detailed explanation of the mapping. You can find it here.
Your solution explorer should look like this now (Domain.cd contains the class diagram of our simple domain). You will have added the design folder and created the class diagram yourself although this is for good practice and not required for the purposes of this excercise.
We now have to tell NHibernate which database product we want to use and provide it the connection details in form of a connection string. NHibernate supports many many database products!
Add a new xml file to the FirstSolution project and call it hibernate.cfg.xml. Set its property "Copy to Output" to "Copy always". Since we are using SQL Server Compact Edition in this first sample enter the following information into the xml file
<?xml version="1.0" encoding="utf-8" ?>
<hibernate-configuration xmlns="urn:nhibernate-configuration-2.2">
  <session-factory>
    <property name="connection.provider">NHibernate.Connection.DriverConnectionProvider</property>
    <property name="dialect">NHibernate.Dialect.MsSqlCeDialect</property>
    <property name="connection.driver_class">NHibernate.Driver.SqlServerCeDriver</property>
    <property name="connection.connection_string">Data Source=FirstSample.sdf</property>

    <property name="show_sql">true</property>
  </session-factory>
</hibernate-configuration>
With this configuration file we tell NHibernate that we want to use MS SQL Server Compact Edition as our target database and that the name of the database shall be FirstSample.sdf (=connection string). We have also defined that we want to see the SQL NHibernate generates and sends to the database (highly recommended for debugging purposes during development). Double check that you have no typos in the code!
Add an empty database called FirstSample.sdf to the FirstSample project (choose Local Database as template)
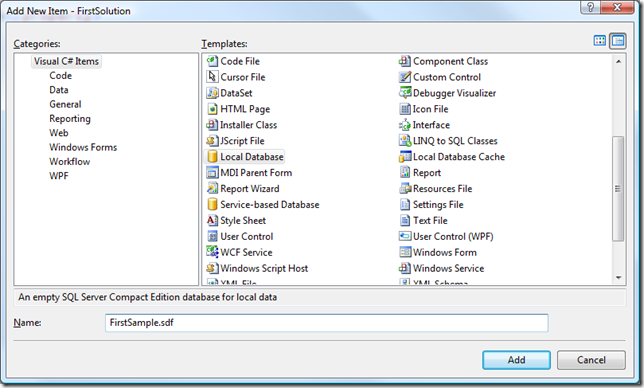
Click Add and ignore the DataSet creation wizard (just hit Cancel).
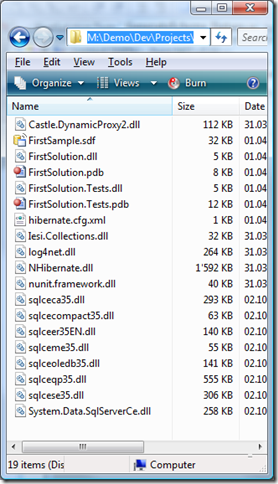
It's now time to test our setup. First verify that you have the following files in your SharedLibs folder
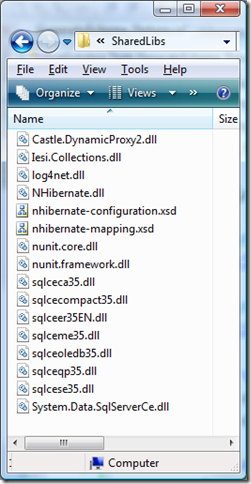
The last 8 files you can find in the "Microsoft SQL Server Compact Edition" directory in your Programs folder.
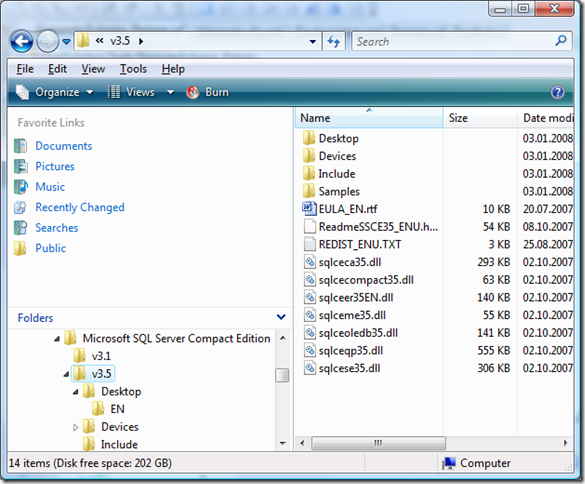
Note: the System.Data.SqlServerCe.dll is located in the sub-folder Desktop.
All other files can be found in the NHibernate folder
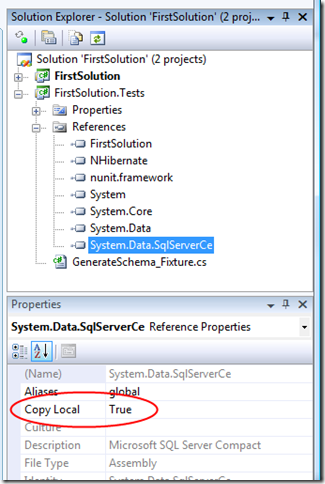
Add a reference to the FirstSample project in your test project. Additionally add references to NHibernate.dll, nunit.framework.dll and Systm.Data.SqlServerCe.dll (remember to reference the files located in the SharedLibs folder!). Pay attention to set the property "Copy Local" to true for the assembly System.Data.SqlServerCe.dll since by default it is set to false! Add a copy of hibernate.cfg.xml to the root of this unit test project. Direct action with NHibernate in the NUnit project needs access to this file.
Add a class called GenerateSchema_Fixture to your test project. Your test project should now look like this
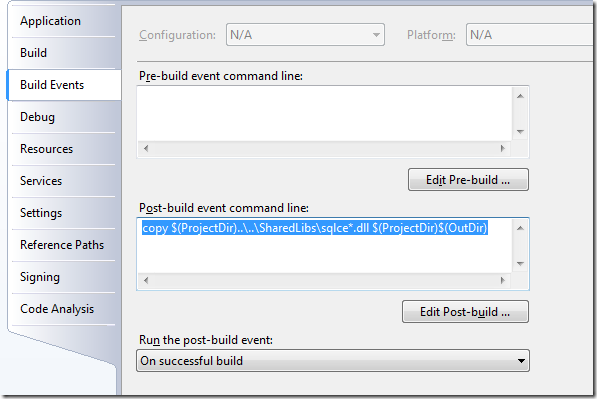
We further need the 7 files sqce*.dll in the output directory. We can do this by using a post-build event in VS. Enter the following command in the "Post-build event command line"
copy $(ProjectDir)..\..\SharedLibs\sqlce*.dll $(ProjectDir)$(OutDir)
Now add the following code to the GenerateSchema_Fixture file
using FirstSolution.Domain;
using NHibernate.Cfg;
using NHibernate.Tool.hbm2ddl;
using NUnit.Framework;
namespace FirstSolution.Tests
{
[TestFixture]
public class GenerateSchema_Fixture
{
[Test]
public void Can_generate_schema()
{
var cfg = new Configuration();
cfg.Configure();
cfg.AddAssembly(typeof (Product).Assembly);
new SchemaExport(cfg).Execute(false, true, false, false);
}
}
}
The first line of the test method creates a new instance of the NHibernate configuration class. This class is used to configure NHibernate. In the second line we tell NHibernate to configure itself. NHibernate will look out for configuration information since we do not provide any information here in the test method. So NHibernate will search for a file called hibernate.cfg.xml in the output directory. That's exactly what we want since we have defined our settings in this file.
In the third line of the code we tell NHibernate that it can find mapping information in the assembly which contains also the class Product. At the time being it will only find one such file (Product.hbm.xml) as an embedded resource.
The fourth line of code uses the SchemaExport helper class of NHibernate to auto-"magically" generate the schema in the database for us. SchemaExport will create the product table in the database and each time you call it it will delete the table and the table data and recreate it.
Note: with this test method we do NOT want to find out whether NHibernate does its job correctly (you can be sure it does) but rater whether we have setup our system correctly. However, you can check the database and see the newly created 'product' table.
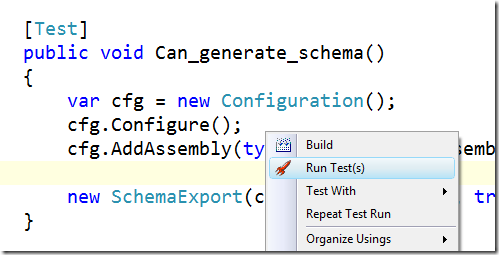
If you have TestDriven.Net installed you can now just right click inside the test method and choose "Run Test(s)" to execute the test.
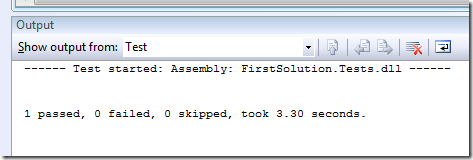
If every thing is ok you should see the following result in the output window
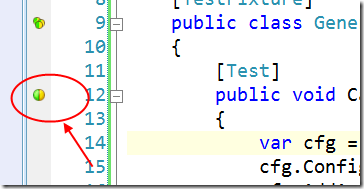
If you have ReSharper installed you can just start the test by clicking the yellow-green circle on the left border and choose Run.
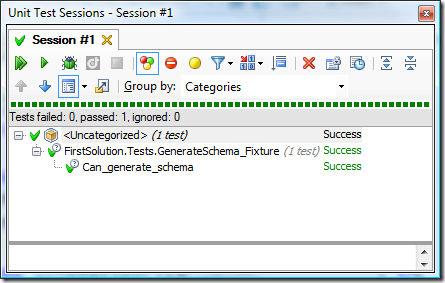
The result is as follows
If your test fails double check that you find the following files in your target directory (that is: m:dev\projects\FirstSolution\src\FirstSolution.Tests\bin\debug)
Double check also if you have no typos in the NHibernate configuration file (hibernate.cfg.xml) or in the mapping file (Product.hbm.xml). Finally check whether you have set the "Build Action" of the mapping file (Product.hbm.xml) to "Embedded Resource". Only continue if the test succeeds.
Now obviously our system is ready to start. We have successfully implemented our Domain, defined the mapping files and configured NHibernate. Finally we have used NHibernate to automatically generate the database schema from our Domain (and our mapping files).
In the spirit of DDD (see e.g. Domain Driven Design by Eric Evans) we define a repository for all crud operations (create, read, update and delete). The repository interface is part of the domain where as the implementation is not! The implementation is infrastructure specific. We want to keep our domain persistence ignorant (PI).
Add a new interface to the domain folder of our FirstSolution project. Call it IProductRepository. Let's define the following interface
using System;
using System.Collections.Generic;
namespace FirstSolution.Domain
{
public interface IProductRepository
{
void Add(Product product);
void Update(Product product);
void Remove(Product product);
Product GetById(Guid productId);
Product GetByName(string name);
ICollection<Product> GetByCategory(string category);
}
}
Add a class ProductRepository_Fixture to the test project of the solution and add the following code
[TestFixture]
public class ProductRepository_Fixture
{
private ISessionFactory _sessionFactory;
private Configuration _configuration;
[TestFixtureSetUp]
public void TestFixtureSetUp()
{
_configuration = new Configuration();
_configuration.Configure();
_configuration.AddAssembly(typeof (Product).Assembly);
_sessionFactory = _configuration.BuildSessionFactory();
}
}
In the fourth line of the method TestFixtureSetUp we create a session factory. This is an expensive process and should thus be executed only once. That's the reason why I put it into this method which is only executed once during a test cycle.
To keep our test methods side effect free we re-create our database schema before the execution of each test method. Thus we add the following method
[SetUp]
        public void SetupContext()
        {
            new SchemaExport(_configuration).Execute(false, true, false, false);
        }
And now we can implement the test method to add a new product instance to the database. Start by adding a new folder called Repositories to your FirstSolution project. Add a class ProductRepository to this folder. Make theProductRepository inherit from the interface IProductRepository.
using System;
using System.Collections.Generic;
using FirstSolution.Domain;
namespace FirstSolution.Repositories
{
public class ProductRepository : IProductRepository
{
public void Add(Product product)
{
throw new NotImplementedException();
}
public void Update(Product product)
{
throw new NotImplementedException();
}
public void Remove(Product product)
{
throw new NotImplementedException();
}
public Product GetById(Guid productId)
{
throw new NotImplementedException();
}
public Product GetByName(string name)
{
throw new NotImplementedException();
}
public ICollection<Product> GetByCategory(string category)
{
throw new NotImplementedException();
}
}
}
Now go back to the ProductRepository_Fixture test class and implement the first test method
      [Test]
        public void Can_add_new_product()
        {
            var product = new Product {Name = "Apple", Category = "Fruits"};
            IProductRepository repository = new ProductRepository();
            repository.Add(product);
        }
The first run of the test method will fail since we have not yet implemented the Add method in the repository class. Let's do it. But wait, we have to define a little helper class first which provides us session objects on demand.
using FirstSolution.Domain;
using NHibernate;
using NHibernate.Cfg;
namespace FirstSolution.Repositories
{
public class NHibernateHelper
{
private static ISessionFactory _sessionFactory;
private static ISessionFactory SessionFactory
{
get
{
if(_sessionFactory == null)
{
var configuration = new Configuration();
configuration.Configure();
configuration.AddAssembly(typeof(Product).Assembly);
_sessionFactory = configuration.BuildSessionFactory();
}
return _sessionFactory;
}
}
public static ISession OpenSession()
{
return SessionFactory.OpenSession();
}
}
}
This class creates a session factory only the first time a client needs a new session.
Now we can define the Add method in the ProductRepository as follows
 public void Add(Product product)
        {
            using (ISession session = NHibernateHelper.OpenSession())
                using (ITransaction transaction = session.BeginTransaction())
                {
                    session.Save(product);
                    transaction.Commit();
                }
        }
The second run of the test method will again fail with the following message
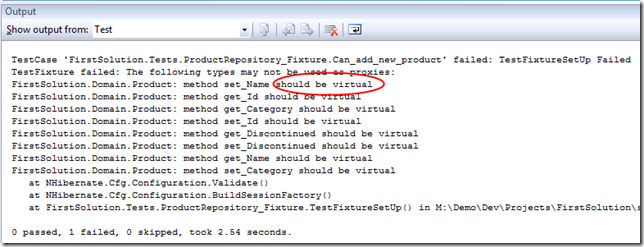
That's because NHibernate is by default configured to use lazy load for all entities. That is the recommended approach and I warmly recommend not to change it for a maximum of flexibility.
How can we solve this issue? It's easy we have to just make all our properties (and methods) of the domain object(s) virtual. Let's do this for our Product class
    public class Product
    {
        public virtual Guid Id { get; set; }
        public virtual string Name { get; set; }
        public virtual string Category { get; set; }
        public virtual bool Discontinued { get; set; }
    }
Now run the test again. It should succeed and we get the following output
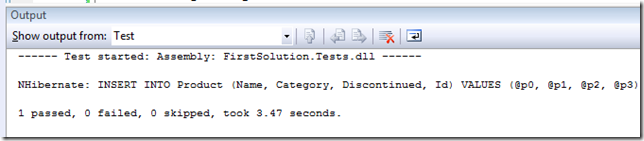
Note the sql spit out by NHibernate.
Now we think that we have successfully inserted a new product into the database. But let's test it whether it is really so. Let's extend our test method
[Test]
public void Can_add_new_product()
{
var product = new Product {Name = "Apple", Category = "Fruits"};
IProductRepository repository = new ProductRepository();
repository.Add(product);
// use session to try to load the product
using(ISession session = _sessionFactory.OpenSession())
{
var fromDb = session.Get<Product>(product.Id);
// Test that the product was successfully inserted
Assert.IsNotNull(fromDb);
Assert.AreNotSame(product, fromDb);
Assert.AreEqual(product.Name, fromDb.Name);
Assert.AreEqual(product.Category, fromDb.Category);
}
}
Run the test again. Hopefully it will succeed...
Now we are ready to implement also the other methods of the repository. For testing this we would rather have a repository (that is database table) already containing some products. Nothing easier than this. Just add a method CreateInitialData to the test class as follows
private readonly Product[] _products = new[]
{
new Product {Name = "Melon", Category = "Fruits"},
new Product {Name = "Pear", Category = "Fruits"},
new Product {Name = "Milk", Category = "Beverages"},
new Product {Name = "Coca Cola", Category = "Beverages"},
new Product {Name = "Pepsi Cola", Category = "Beverages"},
};
private void CreateInitialData()
{
using(ISession session = _sessionFactory.OpenSession())
using(ITransaction transaction = session.BeginTransaction())
{
foreach (var product in _products)
session.Save(product);
transaction.Commit();
}
}
Call this method from the SetupContext method (after the create schema call) and we are done. Now each time after the database schema is created the database is populated with some products.
Let's test the Update method of the repository with the following code
[Test]
public void Can_update_existing_product()
{
var product = _products[0];
product.Name = "Yellow Pear";
IProductRepository repository = new ProductRepository();
repository.Update(product);
// use session to try to load the product
using (ISession session = _sessionFactory.OpenSession())
{
var fromDb = session.Get<Product>(product.Id);
Assert.AreEqual(product.Name, fromDb.Name);
}
}
When running for the first time this code will fail since the Update method has not yet been implemented in the repository. Note: This is the expected behavior since in TDD the first time you run a test it should always fail!
Analogous to the Add method we implement the Update method of the repository. The only difference is that we call the update method of the NHibernate session object instead of the save method.
        public void Update(Product product)
        {
            using (ISession session = NHibernateHelper.OpenSession())
            using (ITransaction transaction = session.BeginTransaction())
            {
                session.Update(product);
                transaction.Commit();
            }
        }
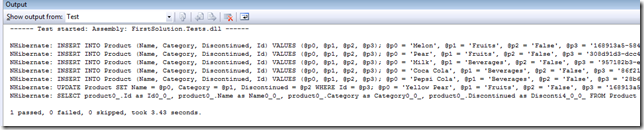
Run the test again an watch it succeed.
The delete method is straight forward. When testing whether the record has really been deleted we just assert that the value returned by the session's get method is equal to null. Here is the test method
       [Test]
        public void Can_remove_existing_product()
        {
            var product = _products[0];
            IProductRepository repository = new ProductRepository();
            repository.Remove(product);

            using (ISession session = _sessionFactory.OpenSession())
            {
                var fromDb = session.Get<Product>(product.Id);
                Assert.IsNull(fromDb);
            }
        }
and here the implementation of the Remove method in the repository
        public void Remove(Product product)
        {
            using (ISession session = NHibernateHelper.OpenSession())
                using (ITransaction transaction = session.BeginTransaction())
                {
                    session.Delete(product);
                    transaction.Commit();
                }
        }
We still have to implement the three methods which query the database for objects. Let's start with the most easy one, the GetById. First we write the test
        [Test]
        public void Can_get_existing_product_by_id()
        {
            IProductRepository repository = new ProductRepository();
            var fromDb = repository.GetById(_products[1].Id);
            Assert.IsNotNull(fromDb);
            Assert.AreNotSame(_products[1], fromDb);
            Assert.AreEqual(_products[1].Name, fromDb.Name);
        }
and then the code to fulfill the test
        public Product GetById(Guid productId)
        {
            using (ISession session = NHibernateHelper.OpenSession())
                return session.Get<Product>(productId);
        }
Now that was easy. For the following two methods we use a new method of the session object. Let's start with the GetByName method. As usual we write the test first
       [Test]
        public void Can_get_existing_product_by_name()
        {
            IProductRepository repository = new ProductRepository();
            var fromDb = repository.GetByName(_products[1].Name);

            Assert.IsNotNull(fromDb);
            Assert.AreNotSame(_products[1], fromDb);
            Assert.AreEqual(_products[1].Id, fromDb.Id);
        }
The implementation of the GetByName method can be done by using two different approaches. The first is using HQL (Hibernate Query Language) and the second one HCQ (Hibernate Criteria Query). Let's start with HQL. HQL is a object oriented query language similar (but not equal to) SQL.
To be added: implemetation of GetByName using HQL. Implement HCQ as below this works as expected and returns a product entity.
In the above sample I have introduced a commonly used technique when using NHibernate. It's called fluent interfaces. As a result the code is less verbose and easier to understand. You can see that a HQL query is a string which can have embedded (named) parameters. Parameters are prefixed by a ':'. NHibernate defines many helper methods (like SetString used in the example) to assign values of various types to those parameters. Finally by using UniqueResult I tell NHibernate that I expect only one record to return. If more than one record is returned by the HQL query then an exception is raised. To get more information about HQL please read the online documentation.
The second version uses a criteria query to search the requested product. You need to add a reference to NHibernate.Criterion on your repository page.
        public Product GetByName(string name)
        {
            using (ISession session = NHibernateHelper.OpenSession())
            {
                Product product = session
                    .CreateCriteria(typeof(Product))
                    .Add(Restrictions.Eq("Name", name))
                    .UniqueResult<Product>();
                return product;
            }
        }
Many users of NHibernate think that this approach is more object oriented. On the other hand a complex query written with criteria syntax can quickly become difficult to understand.
The last method to implement is GetByCategory. This method returns a list of products. The test can be implemented as follows
        [Test]
        public void Can_get_existing_products_by_category()
        {
            IProductRepository repository = new ProductRepository();
            var fromDb = repository.GetByCategory("Fruits");

            Assert.AreEqual(2, fromDb.Count);
            Assert.IsTrue(IsInCollection(_products[0], fromDb));
            Assert.IsTrue(IsInCollection(_products[1], fromDb));
        }

        private bool IsInCollection(Product product, ICollection<Product> fromDb)
        {
            foreach (var item in fromDb)
                if (product.Id == item.Id)
                    return true;
            return false;
        }
and the method itself might contain the following code
        public ICollection<Product> GetByCategory(string category)
        {
            using (ISession session = NHibernateHelper.OpenSession())
            {
                var products = session
                    .CreateCriteria(typeof(Product))
                    .Add(Restrictions.Eq("Category", category))
                    .List<Product>();
                return products;
            }
        }
In this article I have shown you how to implement a basic sample domain, define the mapping to a database and how to configure NHibernate to be able to persist domain objects in the database. I have shown you how to typically write and test CRUD methods for your domain objects. I have taken MS SQL Compact Edition as sample database but any other supported database can be used (you only have to change the hibernate.cfg.xml file accordingly). Ee have no dependencies on external frameworks or tools other than the database and NHibernate itself (.NET of course never counts here).